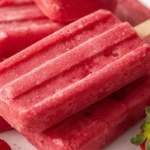
Description
This easy homemade strawberry ice cream bar recipe brings pure joy. Enjoy fresh fruit in a healthy, refreshing dessert perfect for family fun.
Ingredients
- 1 lb fresh strawberries, hulled and quartered
- 1/2 cup water (or coconut water, milk, or yogurt for variations)
- 2–4 tablespoons granulated sugar or honey
- 1 teaspoon lemon juice (optional)
Instructions
1. Prepare the Strawberries: Gently wash and hull your fresh strawberries. Cut them into quarters or smaller pieces so they’re easier to blend. This helps get that smooth texture for your strawberry ice cream bar.
2. Blend Away: Place the prepared strawberries, water (or your chosen liquid), and sugar/honey into a blender. If using lemon juice, add it now too.
3. Achieve Smoothness: Secure the lid on your blender and blend on high speed. You want to keep blending until the mixture is completely smooth and looks like a bright, uniform liquid. Make sure there are no large chunks of fruit left behind. For the ultimate smooth strawberry ice cream bar, you can even pour the mixture through a fine-mesh sieve. This step takes out any tiny seeds if you prefer a perfectly silky texture.
4. Taste and Adjust: This is my favorite step because it’s all about getting the flavor just right for your strawberry ice cream bar! Take a small spoonful of the blended strawberry mixture and give it a taste. Do your strawberries need a little more sweetness? Add another tablespoon of sugar or honey. Want it a bit brighter? A tiny splash more lemon juice will do the trick. Remember, cold flavors can taste less sweet, so make it slightly sweeter than you think.
5. Pour into Molds: Carefully grab your popsicle molds. Slowly pour the delicious strawberry mixture into each mold. Make sure to leave a little bit of space at the top, as liquids can expand slightly when they freeze. These molds are about to hold your future fantastic strawberry ice cream bars!
6. Insert Sticks: If your popsicle molds have a slot for sticks, go ahead and insert a popsicle stick into the center of each filled mold. If your mold comes with a lid that has built-in reusable sticks, snap that lid securely into place. This keeps everything tidy and ready for freezing.
7. Freeze Solid: Carefully place the filled molds into your freezer. You’ll want to let them freeze for at least 4-6 hours. For the best results and to ensure your strawberry ice cream bars are completely solid and hold their shape perfectly, it’s even better to let them freeze overnight. Patience is key for these icy delights!
8. Unmold with Care: When you’re ready to enjoy your homemade strawberry ice cream bar, it’s time to unmold them. This part can be tricky if you rush it, so be gentle! The easiest way is to run the outside of the mold under warm water for about 15-30 seconds. This gentle warmth helps to loosen the frozen bar from the mold, making it much easier to remove.
9. Enjoy Your Creation: After that warm water bath, gently pull on the popsicle stick. Your beautiful, homemade strawberry ice cream bar should slide right out! Admire your handiwork – that vibrant red color and icy texture are a testament to your efforts.
10. Serve & Share: The best part of making delicious treats is sharing them! Hand out these refreshing strawberry ice cream bars to your family and friends. Watch their faces light up with joy as they bite into a cool, fruity pop. There’s nothing quite like the satisfaction of sharing something you’ve made with love. Enjoy every single icy, sweet bite!
Notes
Variations include adding Greek yogurt, coconut cream, or banana for creaminess; mixing in other berries for a berry medley; using tropical fruits like mango or pineapple; drizzling with chocolate; or adding herbs like mint or basil for a unique flavor twist. Store frozen bars in airtight containers or wrap individually to prevent freezer burn.
- Prep Time: 15 minutes
- Cook Time: 3 hour